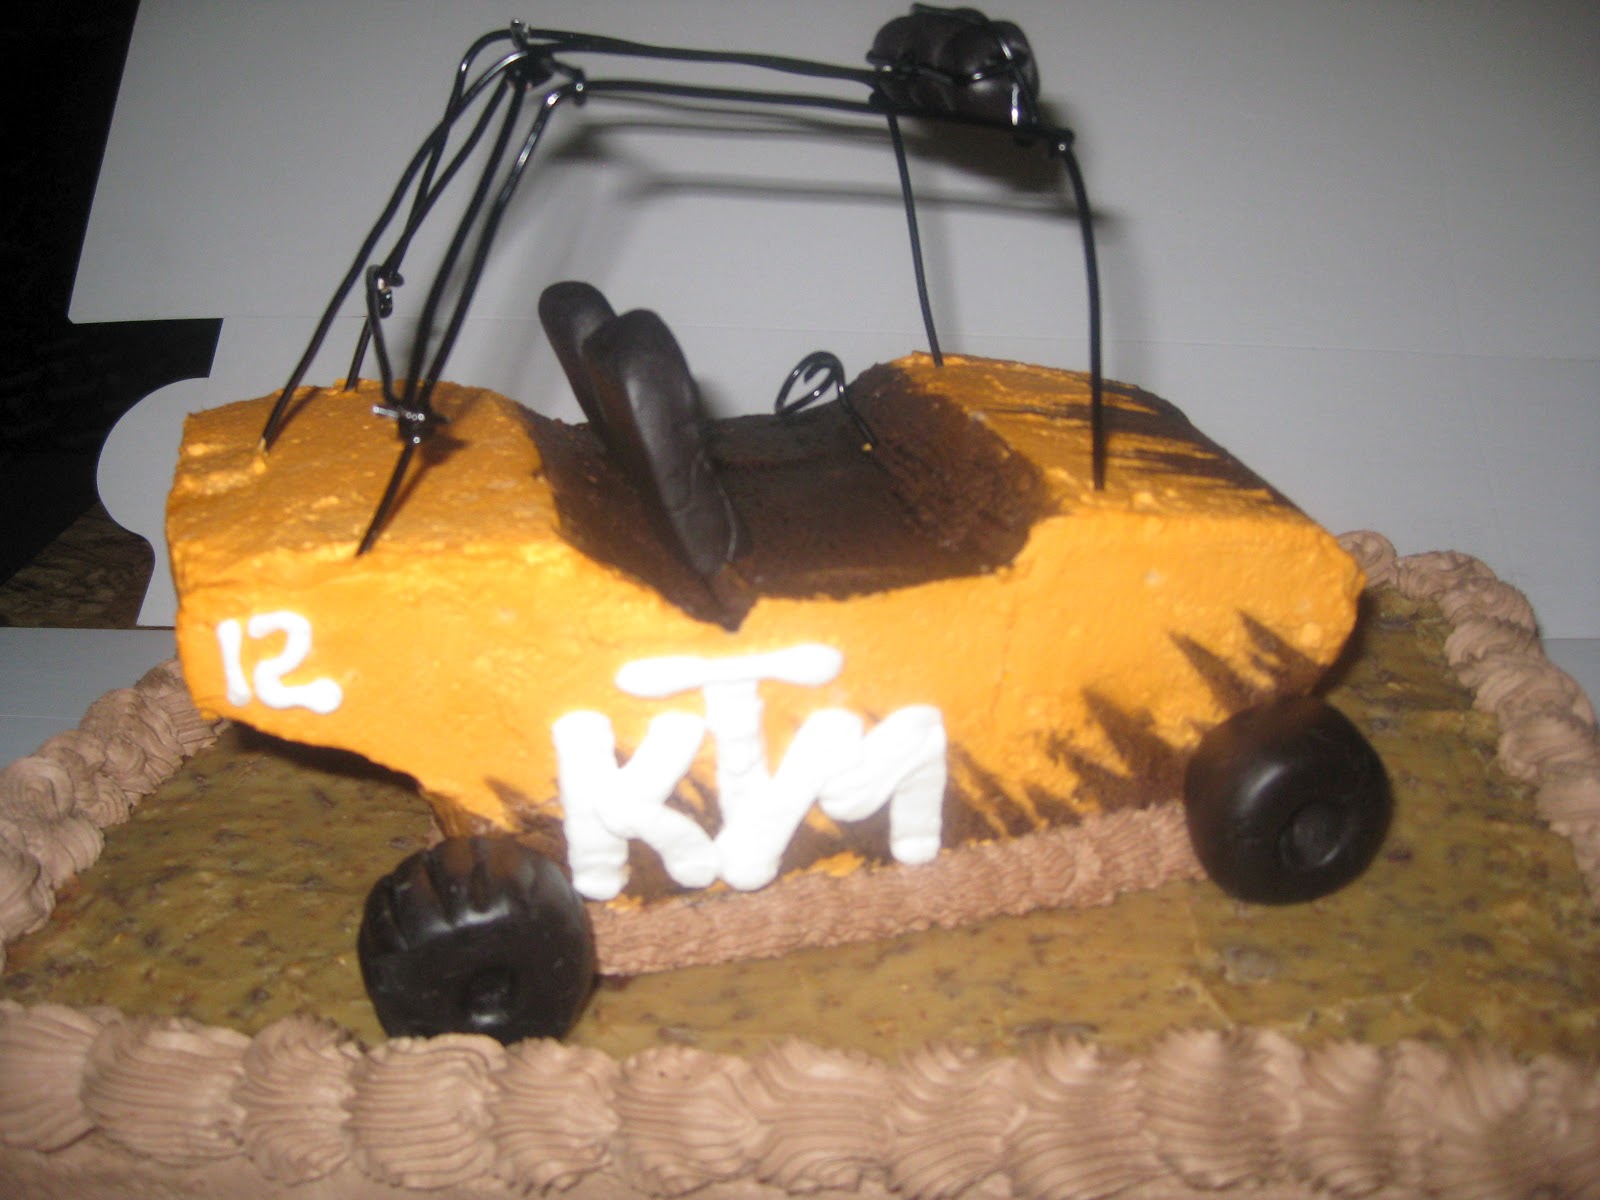
Tuesday, July 10, 2012

Orange Dream Cake

I was asked to make a cake for a family reunion in May. It was very hot outside so I decided to make a cake that would taste much lighter than it actually was. I also had just bought an 8 pound bag of fresh oranges from the fruit stand down the street. Now, the first thing that comes to mind when I think of oranges and summer are the 50/50 bars from my childhood. That tangy refreshing orange sherbet paired with the smooth, creamy, rich vanilla center. I could eat those all day. Well, I looked and found a site called Easy Cake Ideas. There was an Orange Dream Buttercream recipe that I was dying to try. Since I was going with her buttercream and filling recipes, I also decided to go with her yellow cake recipe. (I wasn't that thrilled with the cake itself but the buttercream was to die for.)
So, here it is:


Yellow Cake Recipe
yields one 9” round cake (3 layers) or 24 cupcakes
  • 2 sticks butter (8 ounces)
  • 2 cups sugar
  • 1 ¼ teaspoons vanilla
  • 4 eggs
  • 2 ½ cups plus 2 tablespoons unbleached all-purpose flour
  • 6 tablespoons cornstarch
  • 1 tablespoon baking powder
  • ½ teaspoon salt
  • 1 cup milk

NOTE: All amounts are given in U.S. standard measures.
Preheat oven to 350° F. Prepare 2 x 9” round cake pans by spraying with non-stick cooking spray and lining bottom of each pan with a wax paper circle cut to fit.
1.using an electric mixer beat butter and sugar at high speed until lighter in color and fluffy.
2.add the eggs, one at a time, mixing well after each addition
3.sift the flour, cornstarch, baking powder and salt on to a piece of parchment or wax paper.
4.mix the milk and vanilla together.
5.add the dry ingredients and wet ingredients alternately to the batter, ending with the dry ingredients.
6.pour the batter into the prepared pans (1/3 in one, 2/3 in the other) and bake for 25-35 minutes (20-25 minutes for cupcakes), until a cake tester inserted in the center of the cake comes out clean.
7.cool the cakes in their pans for about 15 minutes then turn out of the pans on to a wire rack to cool completely.
The cake itself seemed dry and very dense. The flavor was OK but I could have achieved that taste from a box mix and not spent the money on all that butter.
The butter cream filling was soo good. 
It started with a basic butter cream filling:
Buttercream filling
  • 1 pound bag of powdered sugar
  • 1/2 cup milk
  • 1/8 to 1/4 teaspoon salt
  • 1/2 teaspoon Vanilla
  • 2 sticks butter, cut into ½ inch slices
  • 1/2 cup shortening
  • using the whisk attachment on your electric mixer, mix the powdered sugar, salt, vanilla and milk at low speed until smooth.
  • add butter, one slice at a time, until incorporated
  • add shortening and whip at highest speed 10-12 minutes, until volume increases by at least 50%.
 Then I made an orange curd and added that to the filling:
To the basic recipe, you add :
  • 3/4 to 1 cup Orange curd (to taste)
To make Orange Curd:
  • 1/3 cup granulated sugar
  • 1 egg
  • 1/3 cup fresh orange juice
  • zest of 1 orange
  • 2 tablespoons plus 2 teaspoons butter, melted
  • In a microwave-safe bowl, whisk together the sugar and eggs until smooth.
  • Stir in orange juice, zest and butter.
  • Cook for one minute intervals on high, stirring after each minute until the mixture is thick enough to coat the back of a metal spoon.
  • Cover the curd with cling film placed directly on the surface of the curd and refrigerate until set.
The Buttercream frosting was very similar. This is definitely NOT a crusting buttercream so it must stay refrigerated until you are ready to serve it. It seemed as though we had buttercream everywhere by the end of the day. But it is so good you won't mind licking it off your fingers.


The Perfect Buttercream Frosting
yields about 8 cups of frosting (enough to fill and frost a 9" round cake - 3 layers)
  • 2 pound bag of powdered sugar
  • 1 cup milk or water
  • ½ teaspoon salt
  • 1 teaspoon Vanilla
  • 2 sticks butter, cut into ½ inch slices
  • 2 ¼ cups shortening (not butter flavor)
  • using the whisk attachment on your electric mixer, mix the powdered sugar, salt, vanilla and milk or water at low speed until smooth and creamy.
  • add butter, one slice at a time, until incorporated
  • add shortening and whip at highest speed 10-12 minutes, until almost doubled in volume 
Orange Creamsicle Frosting
      To half of the basic recipe, you add:
    • ¾ to 1 cup Orange curd (to taste)
to make Orange Curd:
    • 1/3 cup granulated sugar
    • 1 egg
    • 1/3 cup fresh orange juice
    • zest of 1 orange
    • 2 tablespoons plus 2 teaspoons butter, melted
    • In a microwave-safe bowl, whisk together the sugar and eggs until smooth.
    • Stir in orange juice, zest and butter.
    • Cook for one minute intervals on high, stirring after each minute until the mixture is thick enough to coat the back of a metal spoon.
    • Cover the curd with cling film placed directly on the surface of the curd and refrigerate until set.
I also attempted to make buttercream roses out of this frosting. It was extremely soft, so I made sure to keep the frosting chilled until I used it and then as soon as the roses were made I put them in the freezer to set up. They weren't half bad. It looked pretty.
I also candied orange slices to decorate the sides of the cake.

I honestly can't remember where I found that recipe, but I plan on using a different one next time. It was very finicky and I wound up with quite a few orange slices that were slightly burnt or not candied enough. Well, enough chit chat, here is the finished cake.


Friday, June 22, 2012

Rock Star Monkey Baby Shower

Wow, it has been a long time since I posted on here. Sorry about that, I guess I have been a little busy with school. In March we were blessed with a cute little chunky monkey, my new nephew. For his baby shower I made sugar cookies, chocolate cake with strawberry filling and whipped frosting, and strawberry shortcakes. Everything turned out wonderfully.

The polka dots are actually candy melts with the flat side out. I used Wilton's whipped frosting because its what I had on hand and butter cream was not sitting well with the mommy-to-be.
It was a Rock Star Monkey Theme.
I have no idea why it took me so long (the very end, actually) to realize that I could make bananas out of the moons.


The monkeys are actually made from a Girl Scout Trefoil cookie cutter that my mom has had for years. Why buy a new cookie cutter when I already have one that will do the trick.

 My ABSOLUTE favorite! I love how the onesies turned out. I should have made more.
The snaps are Wilton pearls.


Friday, February 3, 2012

Cookie Dough Truffles

These are yummy. I also made these for Christmas and have since been asked for the recipe several times. You can actually find it in several places if you just Google it, but here is a link anyway: Cookie Dough Truffles

1/2 cup butter, softened
3/4 cup brown sugar, packed
1 tsp vanilla
2 cups all purpose flour
1 can (14oz.) sweetened condensed milk
1/2 cup mini chocolate chips
1/2 cup chopped walnuts
candy melts or chocolate bark for dipping and drizzling

In a large bowl, cream butter and brown sugar until fluffy, beat in vanilla. Gradually add the flour, alternating with the milk. Stir in chocolate chips and walnuts.
Using a cookie scoop, scoop out 1" portions and drop onto waxed paper. Loosely cover and chill for about 1 hour.
Remove from fridge and roll into balls. Place back into the fridge for about 1 hour.
Melt candy melts or chocolate and dip the balls coating them evenly. Drizzle with another color of melted chocolate and chill for another 15 minutes or so until set.(Sorry I don't have a picture.)

Moisturizing Kitchen Hand Scrub

I made this hand scrub to give away at Christmas and I absolutely LOVE it. It makes my hands feel so soft and smooth. And it couldn't be easier. I filled jars and tied a cocktail spoon to the top with raffia.

1 1/2 cup sugar
1/3 cup kosher salt
zest of 1 large lemon (or other citrus)
1 cup olive oil
1/4 tsp pure lemon extract, optional

Combine all ingredients in a bowl and mix well. If you like a slightly stronger fragrance, add the extract. Spoon into a pretty jar. Makes enough to fill a 1pt canning jar.
Good Life Eats

Sand Rail

Hello again. About a month ago I was asked to create a cake with a few challenges. First, a German Chocolate cake without coconut or nuts. Second, a replica of a sand rail without fondant or butter cream. So, I made a chocolate cake (the chocolate mousse cake from my last post to be exact, because I really love how moist and chocolatey it is). Then, I made the German Chocolate frosting without the coconut or nuts. I added in a whole bag of Skor toffee bits. It turned out really good, although not as soft as a traditional frosting would have been.
I began with a recipe for Coconut Pecan Frosting.

Coconut Pecan Frosting
1 cup of sugar
1 cup evaporated milk
1/2 cup butter
3 eggs beaten
1 1/3 cups flaked coconut
1 cup chopped pecans
1 tsp vanilla

In a medium saucepan combine sugar, milk, butter and eggs. Cook over medium heat until the mixture starts to bubble, stirring constantly. Stir in the coconut, pecans and vanilla. Let cool to room temperature. Fill and frost your cake.
Enough to fill and frost 2-9" layers

I modified this slightly. I omitted the coconut and nuts and waited until the frosting had cooled a bit so that the chocolate covered Skor bits wouldn't melt. Then I mixed in the toffee bits put it in the fridge (because it has eggs in it) until I needed it. Although I would recommend making it closer to when you need it because it really was too hard to spread after being chilled. But it tasted really good.
Then, instead of butter cream or fondant, I made whipped cream icing. This stuff is great on hot chocolate too.
Decorating Whipped Cream Icing
1 cup heavy whipping cream
2 Tbsp sifted confectioners sugar
2 Tbsp piping gel
1/2 tsp clear vanilla

Combine whipping cream and sugar in a mixing bowl. Whip to soft peaks. Add piping gel and vanilla, then continue to whip until you have stiff peaks. Do not over beat.

Note: You can find the piping gel at Michael's or other cake supply shop. Also, I recommend beating it or making it smooth before adding it. You will over beat the whipped cream trying to beat out any lumps in the gel.
To make chocolate whipped cream, I added a tablespoon or two of sifted cocoa powder to the cream and sugar.

I used the chocolate whipped cream to frost the sides of the chocolate cake and to create a border for the German Chocolate frosting.

Next came the dune buggy or sand rail cake. I baked 2 vanilla cakes in loaf pans. I had to adjust baking time and temperature for these but you will have to see what your oven will do.
I trimmed and layered them to make the frame of the sand rail. I stacked them on top of the German Chocolate cake and stabilized with a wooden dowel. (We didn't need another cake catastrophe.) I layered with whipped cream. Then I colored the rest of the whipped cream orange and frosted the body of the sand rail. I had to let it chill at this point.


After chilling for a little while to keep the whipped cream set, I cut out a stencil of paper and "spray painted" the detail in black. I knew that if I had tried to pipe it on in black, it would have bled into the orange.

I let it chill again before inserting the fondant wheels (a little out of proportion), fondant seats and floral wire roll cage. I added the finishing touches and I think it came out pretty good considering the limitations in decorating medium.